|
|
|
|
|
|
|
Do you want to be a better CNC'er in 37 Seconds? Get Better Tool Life, Surface Finish, and Material Removal Rates Fast. It's that easy. You can install and get results now. |
November 2009 Through January 2010 CNC Blog Archive
1/4/10
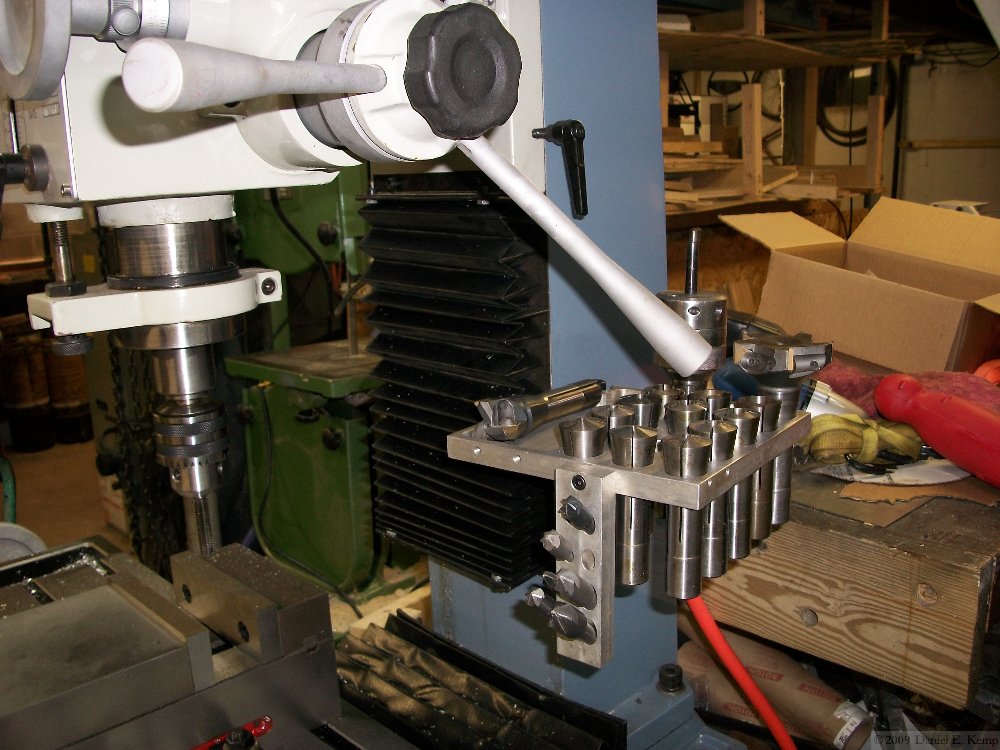
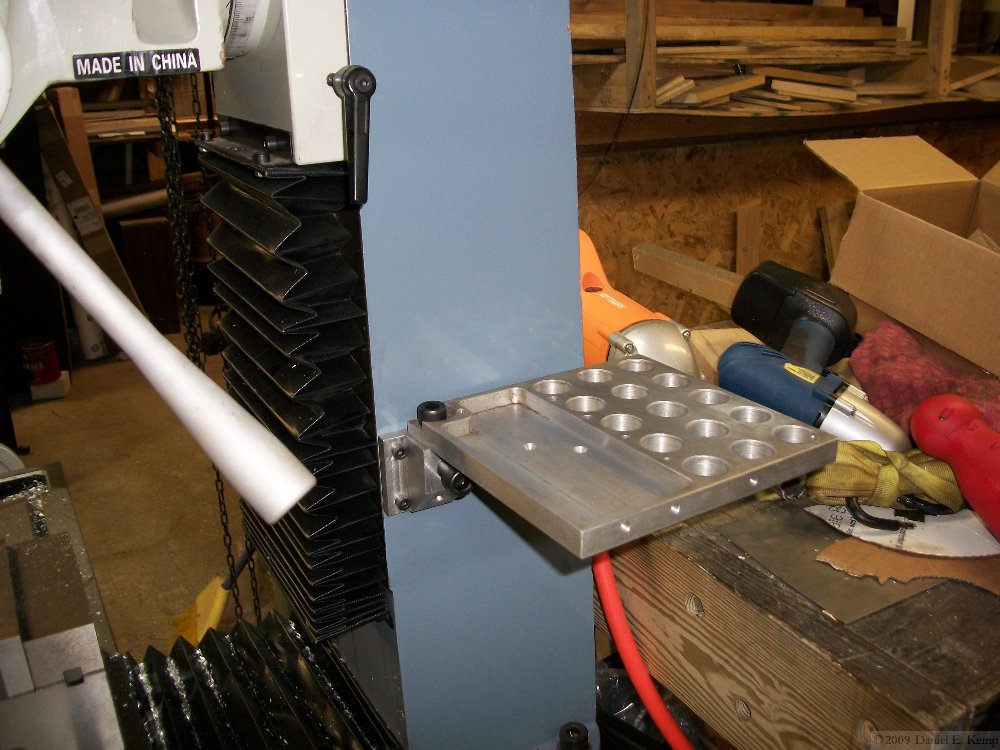
Micro-Miniature Tormach Tooling System
A lot of folks are adding auxilliary high speed spindles to their mills for things engraving and running very small endmills or twist drills. G-Wizard's recommended rpm for a 1/16" HSS twist drill is over 12,000 rpm, for example. Smaller drills, like you would run to drill a PC Board, require even more speed. In fact, there is a whole market out there for companies that sell small very high speed "sensitive" drill presses for this sort of thing. But, they're not CNC.
It's pretty easy to attach such a spindle to your CNC mill's head, and people have done this with everything from Dremel's, to their higher quality Proxxon cousins, to routers, laminate routers, and all sorts of other appliances. Take a look at the page I linked to for some ideas. This is a pretty handy thing, but pretty soon, you're wishing for some of the comforts of home. Perhaps a toolchanger is out of the question, but at the very least, a way to make the cutters repeatable in Z so you don't have to do a touch off for the tool table every time would be nice.
Enter this great idea I saw on CNCZone:
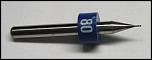
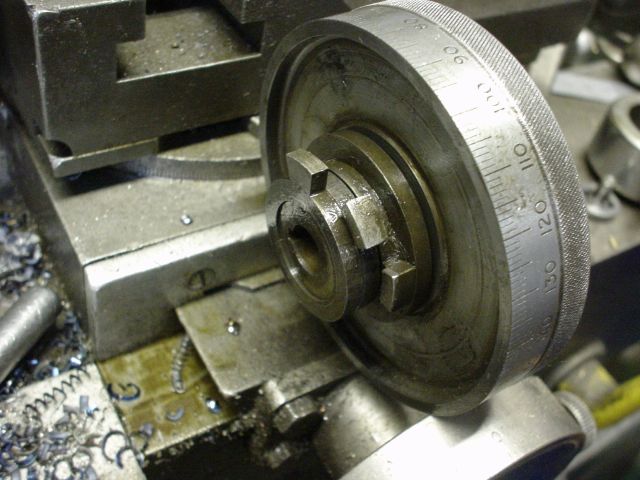
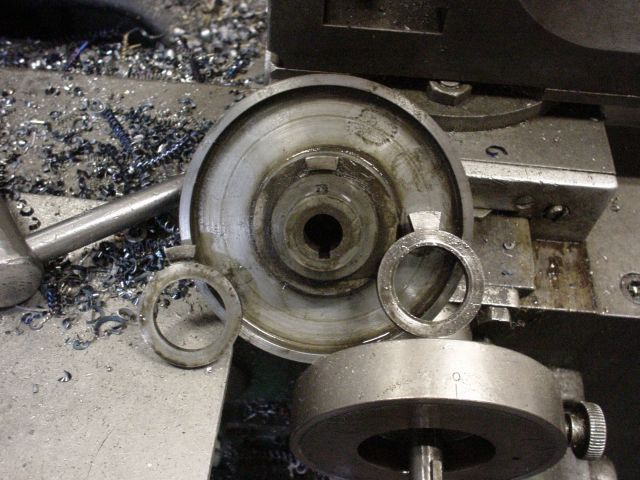
0.020" Endmill with a Distance Ring...
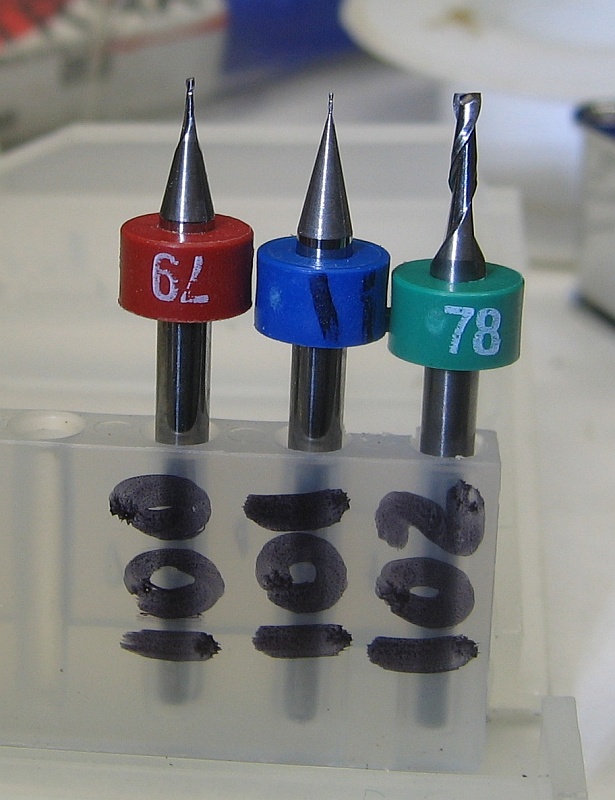
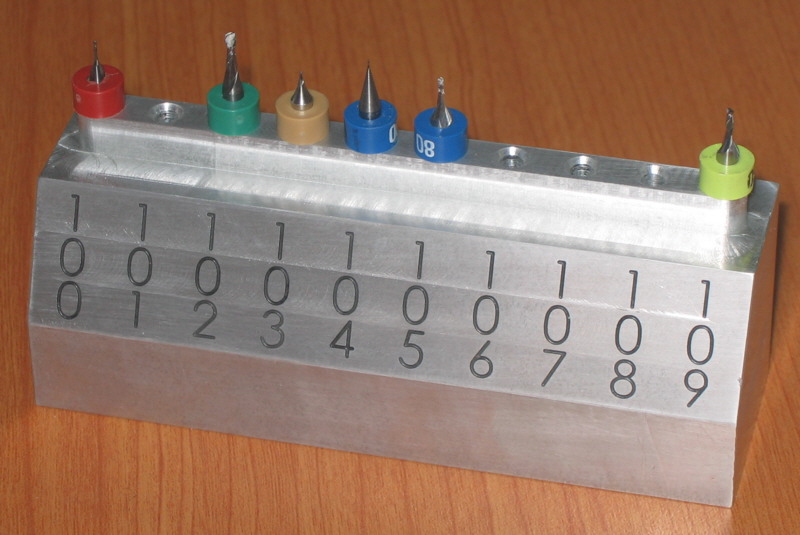
First attempt at a holder with Tool Table numbers. Those cutters are so tiny!
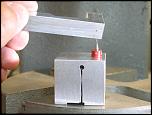
Here is a little fixture to help us press the ring onto the cutter...
Of course when you have a CNC at hand, a nicer holder is only a matter of time...
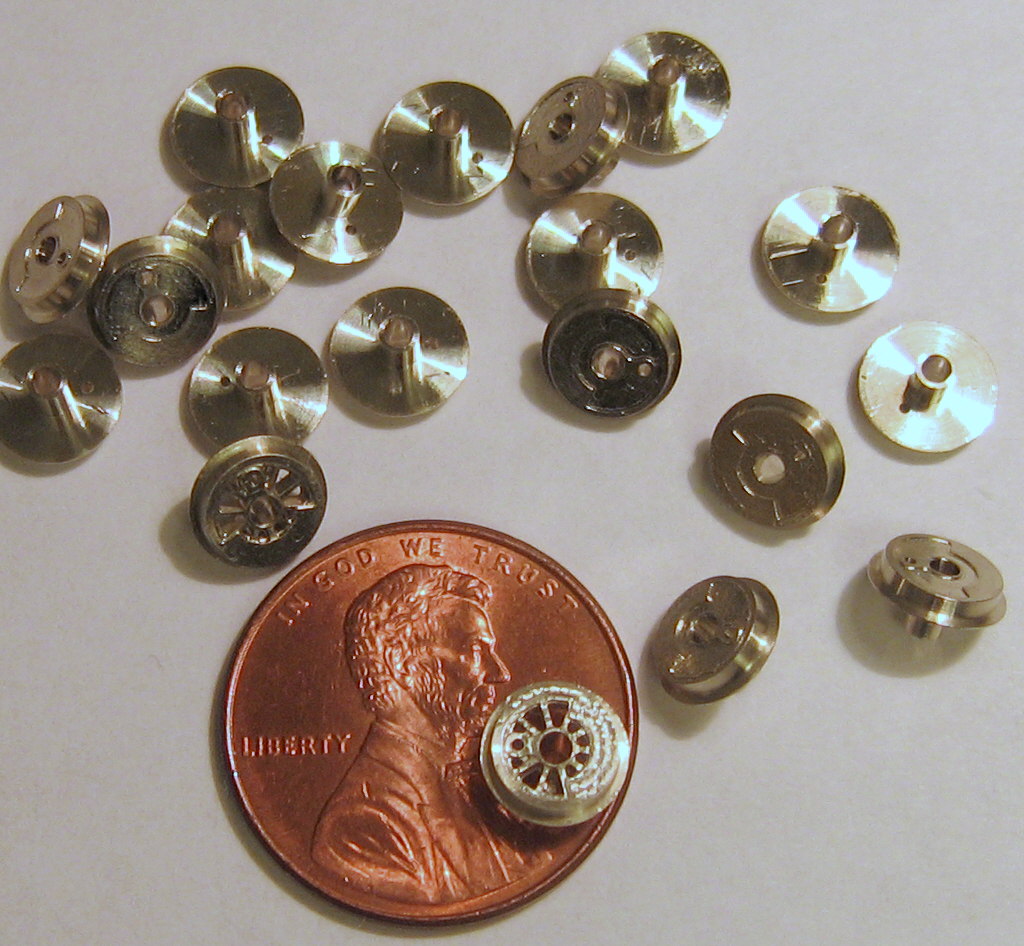
Tiny train wheels next to a penny...
All this micro-machining work was done on a Tormach with an auxilliary Proxxon spindle. I have to say I am very impressed. The requirements for runout and precision have to go way up at these scales. The distance rings are available from PC Board drilling suppliers such as LPKF.
Very cool!
1/3/10
A Drillpress Table Lift
Jerry over on HSM had this nice table lift for his drill press to show:
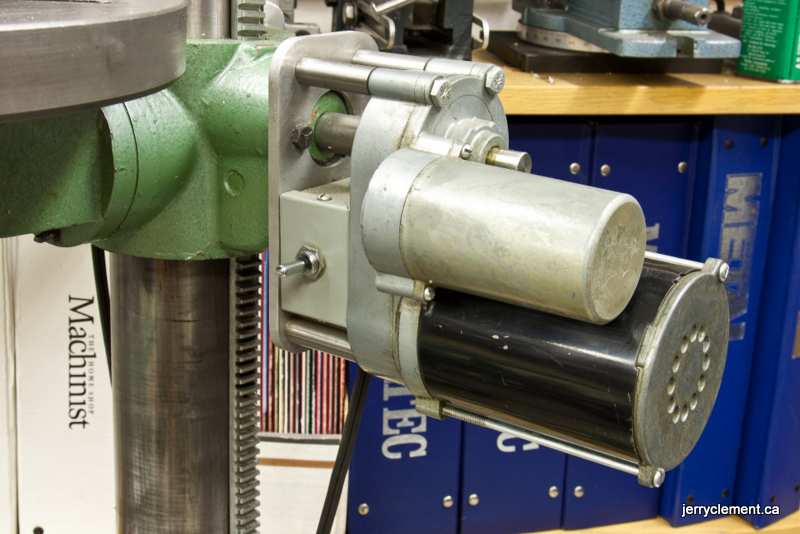
Nice use of a surplus reduction-geared motor, and very compact. I think I'd have mounted the switch up on the drill press head, but that's just me. I have a whole page of drill press mods that I will be adding this one to!
Hoss Machine Has a Nice Rack
The piccy says it all:
It pivots out of the way...
Scraping Video
Scraping is the preferred method when surfaces need to be flat to a high degree of precision, such as when making machine tool ways. lt's a painstaking manual process that I've often wondered about. Here is an excellent video of a Kitamura machinist scraping a casting for one of their machine tools:
Lots of good learning here about the angle to hold the scraper and you can see how he aims for the bluing (which in this case is black). It also looks to me like his scraper is set up so he can apply force with his hip.
Shopmade Motor Couplers
Couplers to link your stepper or servo motor to the leadscrew or other drive mechanisms can be surprisingly expensive. It's not hard at all to make them in your shop. Here's some Oldham-style couplers made as part of a Weiss mill conversion described on CNCZone:
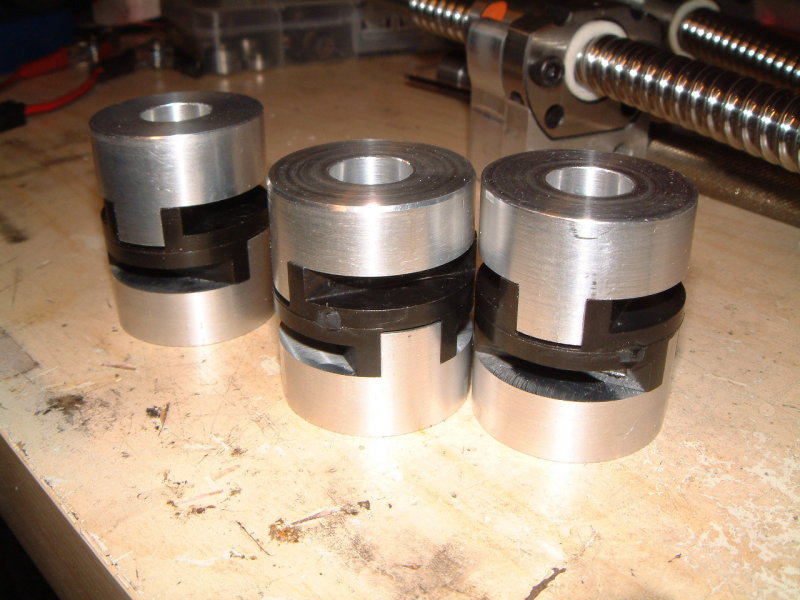
The plastic inside parts where bought as replacement parts very cheaply, which meant only the metal ends had to be machined. As you can see, they're very simple!
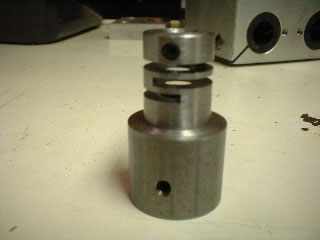
Another example, done with a slitting saw...
What's nice about making your own couplers is you can accomodate whatever special requirements you may have. I've had to bore store-bought couplers to fit a shaft, for example.
12/24/09
Swing Threading Toolholder and other Threading Aids for Manual Lathes
Threading on a manual lathe seems to be a scary process the first time around. I didn't attempt it for my first year or two of turning, for example. Eventually, you reach a point of needing to thread something that's too big to make sense for a tap or die, and then you just have to deal with it. I'm not going to try to attempt to explain threading on the lathe here, there are lots of good resources that do that. Personally I like the Southbend Lathe Book, which is readily available.
Rather, I'm going to talk about a couple of aids for threading that I have come across recently. It seems that the issue that really bothers people is the retraction, often complicated by the desire to thread up to a shoulder. There is a certain amount of pressure on the operator to do several things very quickly: stop the feed, retract the cutter, reverse to start the next pass, advance the cutter, restart the feed at exactly the right point on the threading dial. If you make a mistake, you can bollocks up the thread or crash your threading tool into your shoulder. I hate when that happens!
So the first aid I came across is what I will call a "Swing Threading Toolholder." This is a cool idea from HSM and other boards. When it comes time to reverse, stop the lathe, and simply reverse. Leave the half nut locked (some shops feel this gives a more accurate thread anyway). The "swing" is because the tool is free to swing upwards when it contacts the threads moving in reverse, so it doesn't cut on the return pass and you needn't retract.
Here are some Swing Threading Toolholders:
John Stevenson modified a carbide threading tool with a pivot and shelf underneath...
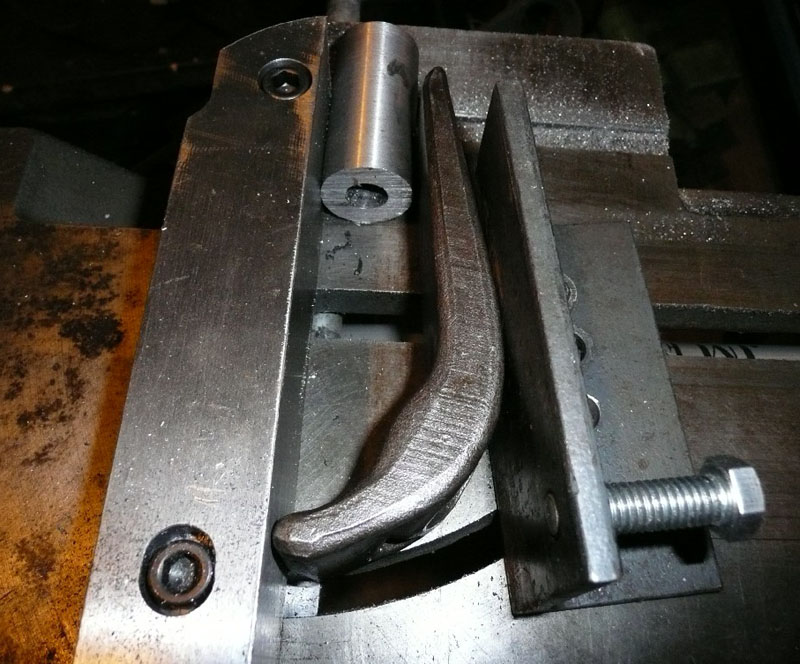
Gary Hart made a swing threader that uses carbide inserts...
It pivots on a 1/4" dowel pin.

That's a fancy looking little design. I wonder if the handle locks the swing or what?
(A kindly reader has informed me this is a George Thomas design that was published in Model Engineer. The lever may be used to withdraw the cutter.)
Bogstandard's very elegant looking version. I saw his first, so I saved it for last...
By all accounts, these Swing Threaders work really well. John Stevenson says it is the fastest thread he had ever cut.
Another manual threading aid is a system of stops on your handwheel. The Monarch 10EE's came with such a system. There are various shopmade ways of providing something similar:
This is John Stevenson's copy of the 10EE system...
The exploded view of the 10EE system. Note the setscrew on the right.
To engage the system, just wind the set screw in. It will engage the first of the three dogs. That gives you one rotation until the first dog engages the second, giving another rotation to engage the third for a last rotation. So you can turn the handwheel 3 rotations against the stops. The depth of cut is set by the top (compound) slide. Set the depth, crank the lower slide all the way to the stop, cut a pass, retract the lower slide to opposite stop, and traverse back for another pass. I kind of like the Swing Tooling better, but who can argue with the genius of Monarch? John has retrofitted this to some other lathe in his shop, a TOS I think?
A similar idea that engages a pin in the dial. This would only allow one turn of retraction.
Here the thread stop is flipped up to disengage it...
12/20/09
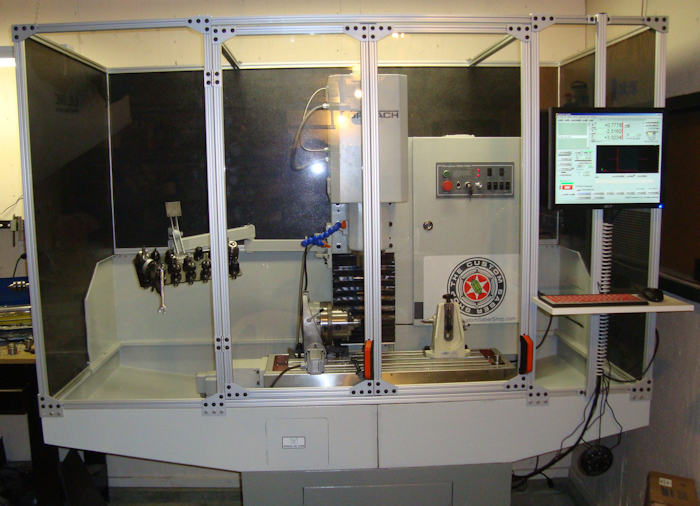
Spectacular Tormach Flood Enclosure
This was up on CNCZone, just gorgeous:

Some Vibratory Polishing Tests...
I threw some parts I had in the vibe and left them for 4 days with walnut shells impregnated with green rouge. Here is what I got back:
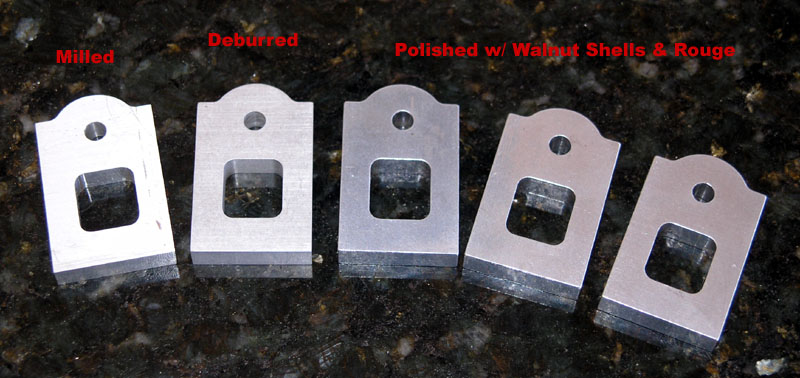

On the left is a part straight off the mill, covered with all sorts of tooling marks. Unfortunately, the flash makes it hard to see when looked at face on. It's hard to photograph these finishes!
Next up is the part marked "deburred". It ran overnight with some deburring media until it had a nice satin finish. There is definitely some grain still on it. In fact, I had some parts that had the vibratory deburr and some that didn't. The ones without were shiny with deep scratches left from the tooling marks. I didn't bother photographing them as the satin finish from the deburr looked better to my eye. Lastly, we have 3 parts on the right that got a 4 day polish in the vibe. There is still some grain visible, so I can't truthfully call it a "mirror", although I notice a lot of people want to call any shiny part a "mirror". But, they are quite shiny. You can see the bottom photo they are reflecting the grain of the granite countertop they're sitting on. All in all it is a nicer finish than the deburr. I suspect it would be nice to have had some grade of abrasive in between the deburr and the polish. I'm not sure what that would be, but there's still too much grain after deburr for the polish to get it to a mirror.
I find when polishing I often have the problem of moving to the next finer grade too soon, only to have it do a wonderful job highlighting scratches that should have been taken care of with the coarser grades. In any event, I am reasonably happy with this first time polishing result. It looks like something you'd buy commercially and think nothing of it. Best of all, I literally forgot about it while the vibe did its work.
I need to experiment a bit more on my exact processes, but I really like this approach. The polished parts also picked up a wonderful smooth feel.
Separating Chips from Coolant in a Shopmade Enclosure
If you're going to run flood coolant, an enclosure is a must to keep the mess under control and out of you shop. I keep an Idea Notebook of shopmade enclosures because at some point I'll be tackling this chore for my IH Mill. There are lots of good ideas there. The latest one I ran across is this approach to separating the chips and the coolant seen on CNCZone:
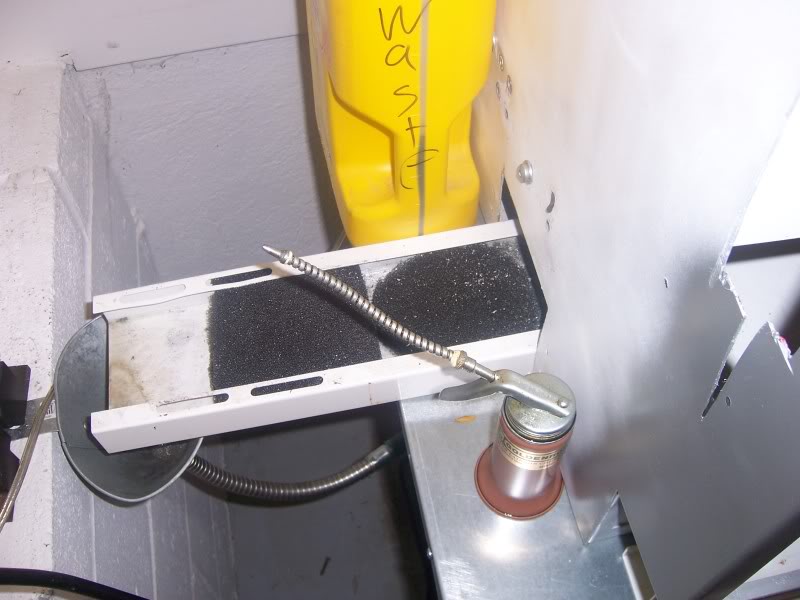
At first I thought it was a chip conveyor...
The idea is to slow down the flow along a shallow incline so the chips can drop out through gravity. Presumably a couple of ridges would help even more with the process. He also uses the normal arrangement of de-humidier foam filters and that sort of thing, but I think the real secret is this trough. Most of these enclosures just mount a kitchen-sink drain in the bottom and pipe it straight down to the coolant reservoir. Letting gravity and slowly moving coolant (because that trough has only a shallow incline and is very wide and deep compared to the amount of coolant seems a clever move.
Ultimately the coolant winds up in this reservoir under the enclosure...
12/12/09
Blast Cabinet Tweaks
Blast cabinets are really handy to have in the shop (if you've got room, they're not compact). The cheap ones actually work really well (I gave $60 for mine on eBay), but they have their drawbacks too. So, as any good machinist would do, we start thinking about how to "improve" the cabinet. Here was a good idea I came across on HSM:
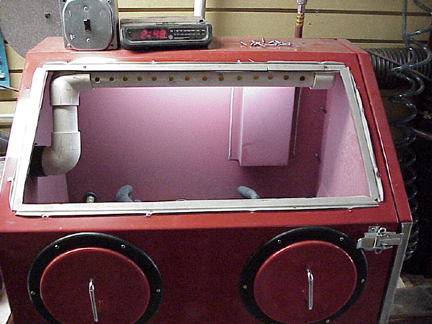
Note the PVC with holes run along the top. This is Steve45's idea to blow some air across the window to keep the dust away so he can see what he's doing. The other thing that seems to help is adding a ShopVac-based dust collector. I understand even the cheap ones from Harbor Freight make a nice difference.
Lately I have also been eyeing some higher quality guns. The gun that comes with a cheap blast cabinet is serviceable, but not very slick. At some point it will wear out and I'll look at nicer guns. A company called TP Tools has some interesting blast cabinet accessories including higher quality guns and a lot else. Their niche is air equipment of all kinds, but they specialize in blast cabinets, painting, and compressors. I found out about them after purchasing an electric compressor drain on eBay for my big Eaton compressor.
12/11/09
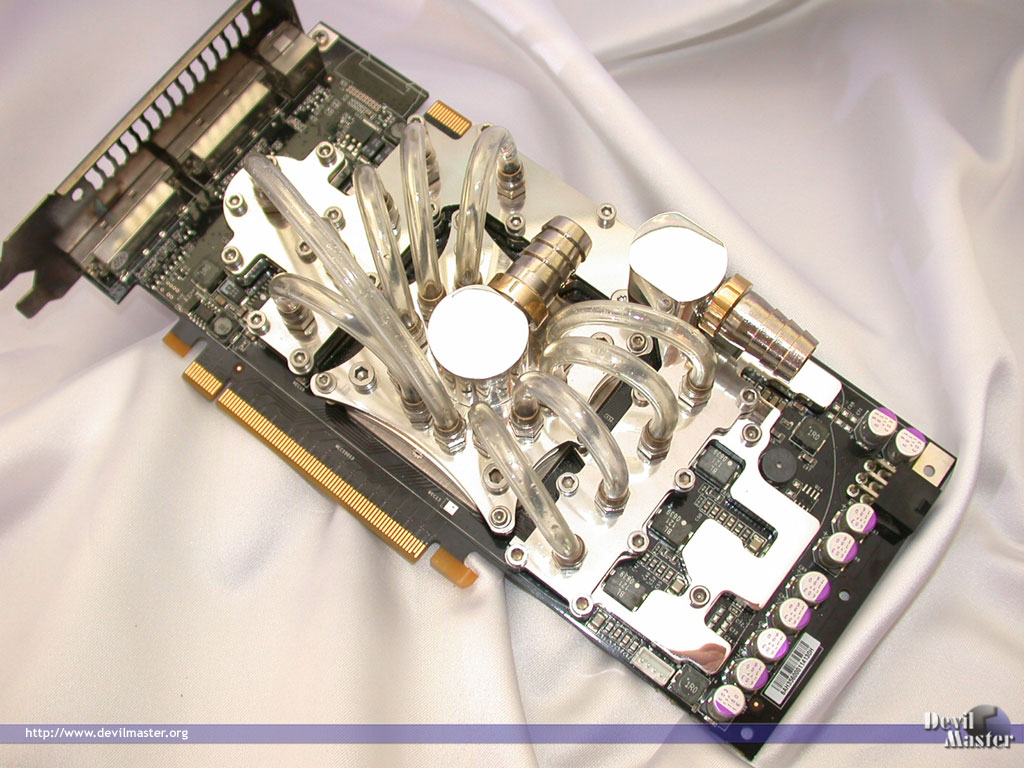
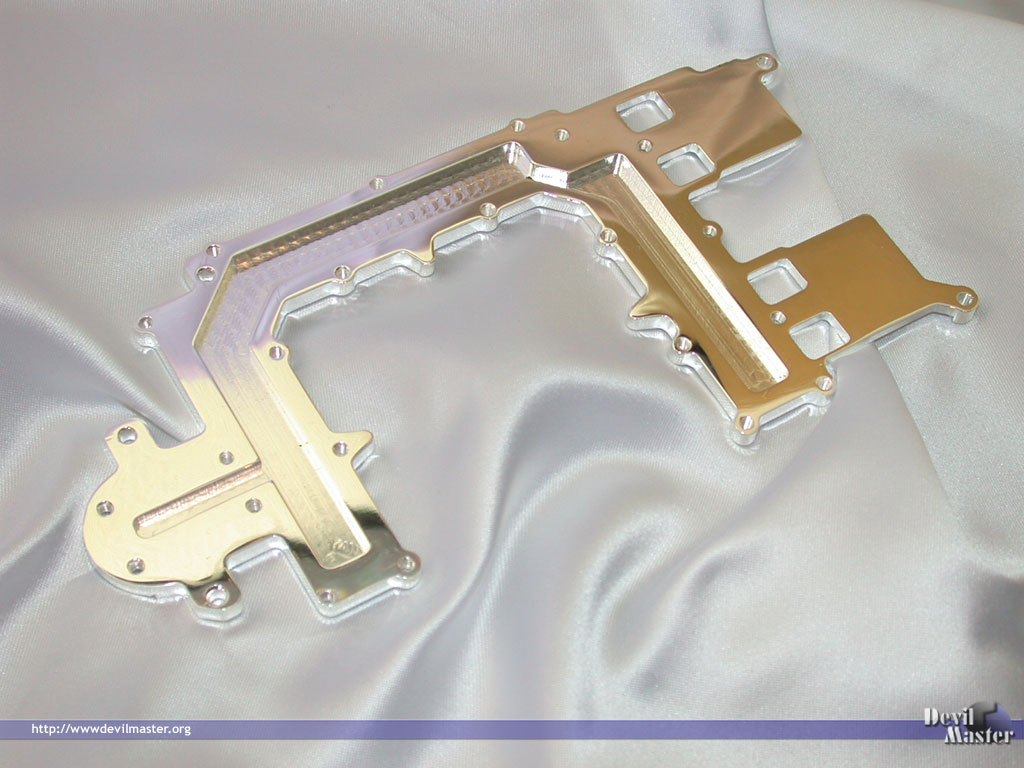
The Devilmaster Redux: Gorgeous CNC Router
If you've never seen the Devilmaster's work, you must take a look. It is really outrageous. Here is his fixed gantry CNC router as pictured on CNCZone (which brought me back to Devilmaster's delightful work):
So many tasty touches on this beauty!
Here is his watercooled PC video card, which is one of the things he likes to use his router to make:
My brother loves woodworking, and we keep talking about building a CNC router for him. I'd love to do something like this but on a much larger scale. He'd need 4' x 4' or maybe larger as he likes to do furniture. I keep thinking about building a fairly massive gantry out of epoxy granite too, and did a design sketch and some notes about how to go about it.
Epoxy Granite Table with Inserts...
12/10/09
The Master Jaw System: Turn Your 3-Jaw Chuck Into a 5C Collet Chuck
Yantra3D, from CNCZone, sent me a note today letting me know that if you liked Geoff's Excellent Collet Chuck Alternative (see the article below), you can buy one off the shelf called The Master Jaw System. Apparently it is a "precision length" system. I assume (you know where that leads) that means that if you align the workpiece against a stop and then lock down the collet it doesn't move. One annoying thing about 5C's is that most collet closers pull the collet back into the taper, which of course means the length is all over the place.
Cool!
12/8/09
Make It Easier Changing Pulleys for Machine Speed With a Bicycle Chain
Well sort of. I thought this idea from Weirdscience on HSM was pretty clever:
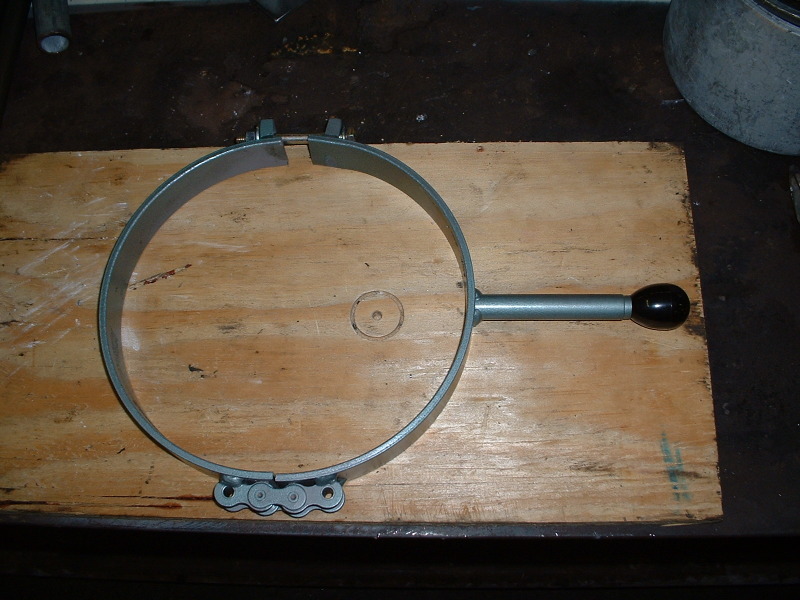
Bicycle chain hinge on the bottom is pure genius...
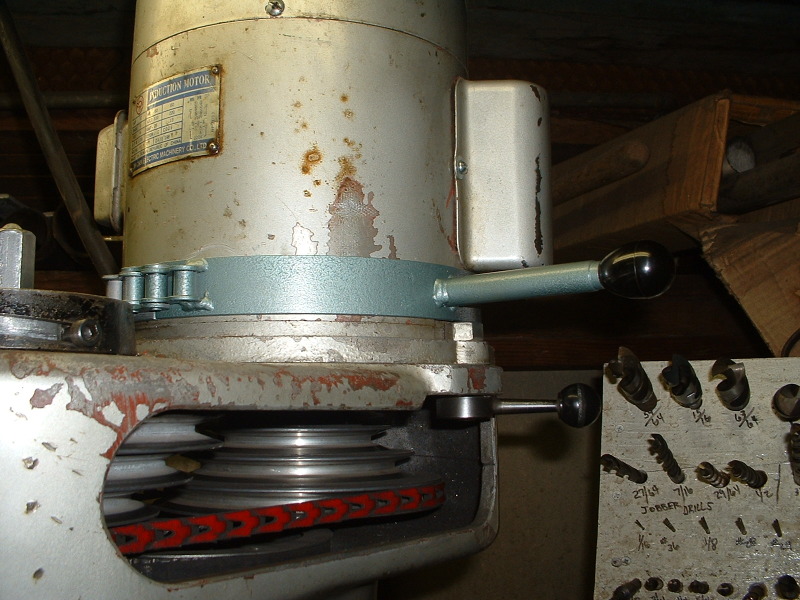
Sure beats yanking on that capacitor!
What does a first-time Mill user need?
Every now and again, a newcomer wants to know what basic tooling they should acquire. The trouble is, as a newcomer, you're not in a good position to judge (been there, done that). So I thought it would be helpful to create a thread where experienced machinists talk about what the MINIMUM set of tooling to get started with a mill might be. By MINIMUM, we're trying to help folks out who are on a budget, but not go crazy with it. Let's also have a NICE TO HAVE category of the first things you'd buy after you get past MINIMUM. And, let's assume they own no tooling whatsoever, not even a calipers. My list is below. What's your list?
MINIMUM
Workholding:
- Kurt-style vise (or a grinder vise if the mill is really small)
- Parallels
- T-Slot Clamping Kit
Tool Holders
- R8 End Mill Holders
- R8 Keyless Chuck
Note: Some prefer R8 collets, and they're definitely cheaper. I've always used the solid holders and like them a lot better!
Measurement & Layout
- Digital Calipers
- Counterpunch
- Sharpies (Buy a box, they're cheap and hugely handy!)
- Calculator (Online like G-Wizard or handheld)
- Dial test indicator. Don't get a tenths indicator to start, though you could consider 0.0005" indicators.
- Some way to attach the DTI to your mill spindle for tramming. An Indicol or clone (available cheap!) would work great.
Cutters
- Spot drills / Center drills
- Twist drills (I prefer screw machine length as they're more rigid. I almost never use the jobbers, and most peeps will already have some of those anyway)
- Endmills: 1/8, 1/4, 1/2 in 2 flute and 4 flute. At least 2 of each size.
Other
- We haven't talked about how you will cut stock to size. Hopefully you have a bandsaw or chopsaw. Failing that, get a hacksaw.
- WD-40 to use as coolant. If you can, buy a spray bottle and the gallon can of it rather than the aerosol. It's cheaper in the long run.
- Cheap chip brushes
- A decent file
NICE TO HAVE (What to buy after you have a little time with the MINIMUM)
- Make or buy some softjaws for your Kurt vise.
- 1-2-3 blocks, and eventually 2-4-6 blocks
- Edgefinder: I like the electronic kind, which can be converted to probes in Mach3 if you go CNC.
- Small Kant-Twist clamps: Tons of uses beyond clamping. They make great vise stops, for example.
- Deburring cutters. I like the zero flute style.
- Scraper-style deburring tool
- A flycutter or a face mill
- Surface plate and height gage: This one is borderline NICE TO HAVE. But I sure do use mine a lot, especially for layout when manual milling.
Must We Have a Burr When Drilling?
Lately I have seen arguments break out over whether machining will always produce burrs. The answer, so far as I can tell, is "Yes, but not always noticeable burrs." For example, when doing my light cut/high feedrate machining with chip thinning, I see minimal burring. A fellow named TatooMike, who frequents various boards gave a great suggestion about how to eliminate burrs when drilling. He suggests creating a fixture so that the workpiece is stacked atop another piece. You've probably noticed when drilling stacked parts that only the bottom part in the stack gets the burr. If that bottom part is your fixture, you may have saved yourself some deburring.
The other thing I saw suggesed, but haven't tried, is the idea that excessive burring with a twist drill is a result of plunging too fast. Certainly having the proper feeds and speeds helps, but I wonder if slowing the plunge as you near the hole exit on CNC ops wouldn't also be helpful.
Tapping With Ye Olde Butterfly Impact Wrench
Josh from the HSM board sent me a PM this morning. He has made a real nice video on YouTube of my idea of tapping with the Butterfly Wrench:
Tapping made easy...
You need a set of Irwin's tap wrench adapters for a socket wrench, I got mine from Enco:
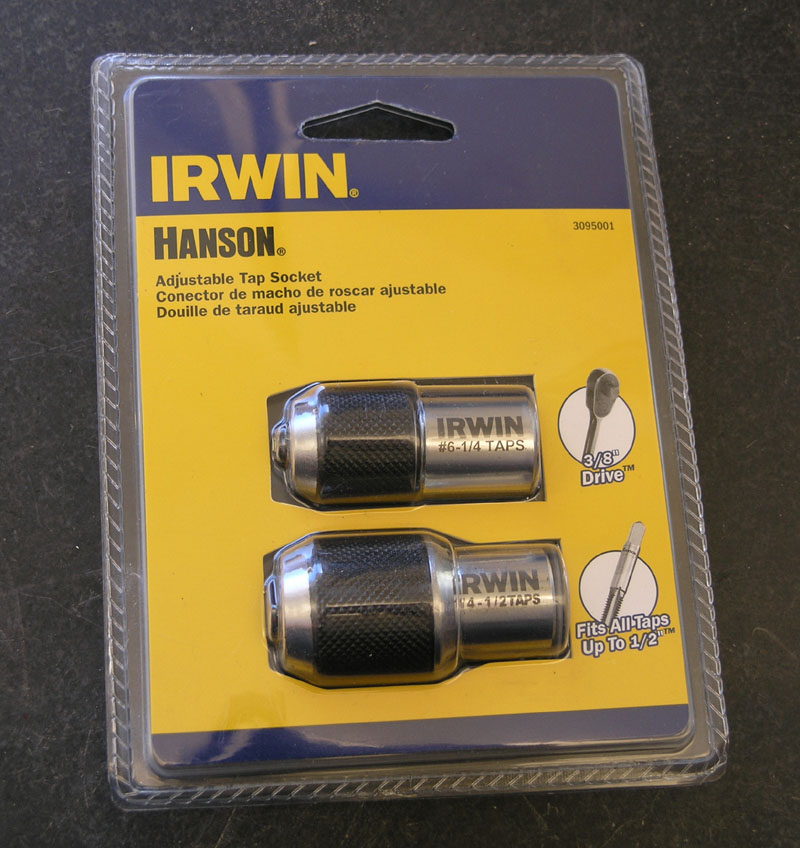
It's amazing how well these little wrenches work, and they're dirt cheap. I have one built into my powered drawbar, one loose, and one attached as a "hand powered drawbar" to my 2nd mill:

Just reach up on top of the spindle with this and tool changes are a snap!
People worry these impact wrenches will break their taps. I haven't broken one yet, but I'm not sure I'd use a really tiny tap in the impact wrench.
To reduce the likelihood of breaking a tap, consider the following:
- Always use tapping fluid. I like tap magic and keep a can near the vise where most of my tapping occurs. I apply it liberally to the tap. Josh is spraying on some WD-40, which ought to work too.
- There is a built-in regulator on the wrench. Turn it down for smaller taps so you don't have full torque. These little wrenches don't have a ton of torque anyway. You can see in Josh's video his wrench really slowing down when it starts to cut.
- Use sharp taps. Josh is using a hardware store tap. They work, but there are better taps to be had. Do yourself a favor and get some form taps and some spiral taps for the hardware sizes you use most often in your shop. Wait until they go on sale and buy a few in each size. Be sure to get quality US made taps. Try them by hand first and you'll be amazed at how much less pressure is needed to tap a hole. The spiral taps extract the chips right up out of the hole very nicely. They designed so you don't have to keep reversing to break the chips, just keep on going. Form taps require a little more effort. They don't make a chip at all, they cold form the metal to produce a thread. I read on one manufacturer's site that they are 4x stronger (and therefore less likely to break) than cutting taps. I prefer form taps in aluminum, but there is a limit to how hard a material they will cut. Mild steel at best.
- Make sure your've got the right-sized hole! My G-Wizard Machinist's Calculator will figure that out for you based on what % thread you want to cut. If you're at all worried, choose a lower % of threads. The threads won't be as strong, but the bigger hole will make it easier to tap.
- It really matters to thread along the axis of the hole. That means the tap has to go in straight. There are lots of ways to ensure this, but a moment of inattention is all it takes to blow it. Once you have cut threads at an angle, it's too late. The smaller the tap, the more sensitive they will be. For real small taps, I use a piloted tap wrench in a drill press, a milling machine, or my lathe tailstock.
Eventually, I am going to build a tapping arm, which makes it easy to tap holes that are perfectly vertical:
Commercial tapping arms use air drills. They're available, but you want one with a low rpm and easily reversible with your thumb. So far I haven't seen one like that for less than about $500. So I use my Butterfly Impact Wrench which cost less than $25. Try it, you'll like it!
11/15/09
CNCCookbook Gets a New Bandsaw
It has been a busy weekend for the CNCCookbook.
I have had the ubiquitous small Harbor Freight horizontal bandsaw for a long time. I found I use it more often in vertical mode than horizontal once I made a little table for it. The little saw has been handy, but it's just too small for many projects. A lot of stock and machining time can be saved by using a bandsaw to cut things closer to size. A rule of thumb is to get within about 0.100" of your milled cut. So I've been on the lookout for a bigger saw for some time. I wanted something local and good sized.
The new (to me) saw is a Delta Rockwell 18", which is quite a bit bigger!
It looks gorgeous and new with only has 500 hours of running time on its Hobbs meter:


This saw looks identical to the saw we had in my high school shop class, although it is much newer. Nice to be able to put a piece of American Iron still in good shape into my shop. This machine is capable of cutting either wood or steel, so it has a nice broad range of speeds that include a 2 speed Lo-Hi gearbox and a variable pitch pulley to change speeds within the range.
Now I will still need to come up with some 3 phase power before I can fire it up!
Finished a New Coolant Mister Last Weekend
But I'm just now getting the article written and photos posted. The full details are on the project page for the mister. It looks like this:

Originally I was going to build the mist nozzle/mixer too, but I got an eBay deal on a Noga unit...
11/14/09
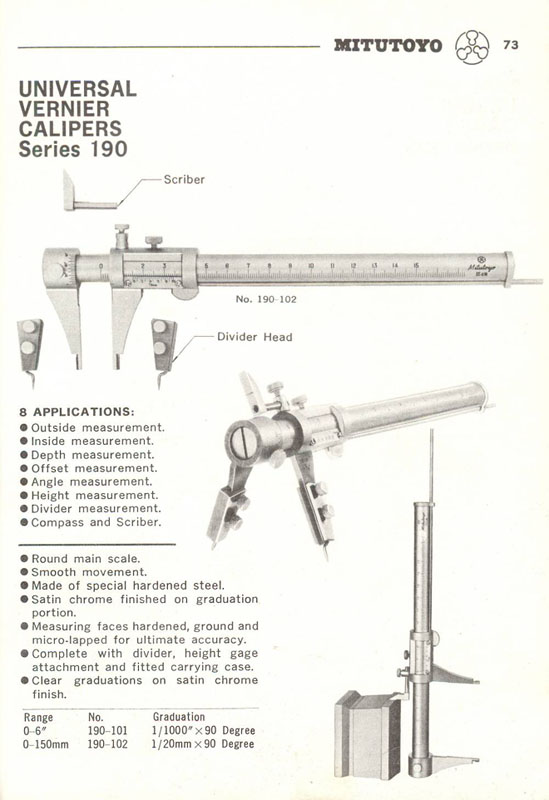
Mitutoyo 190: Swiss Army Knife of Calipers?
Saw this on PM after a kind soul brought it to my attention via PM:
That's cool!
Wouldn't work for me, being a child of the digital rather than the vernier age, but it sure is cool!
I'm wondering if there isn't a project here somewhere to adapt a standard digital caliper to do all these tricks.
11/13/09
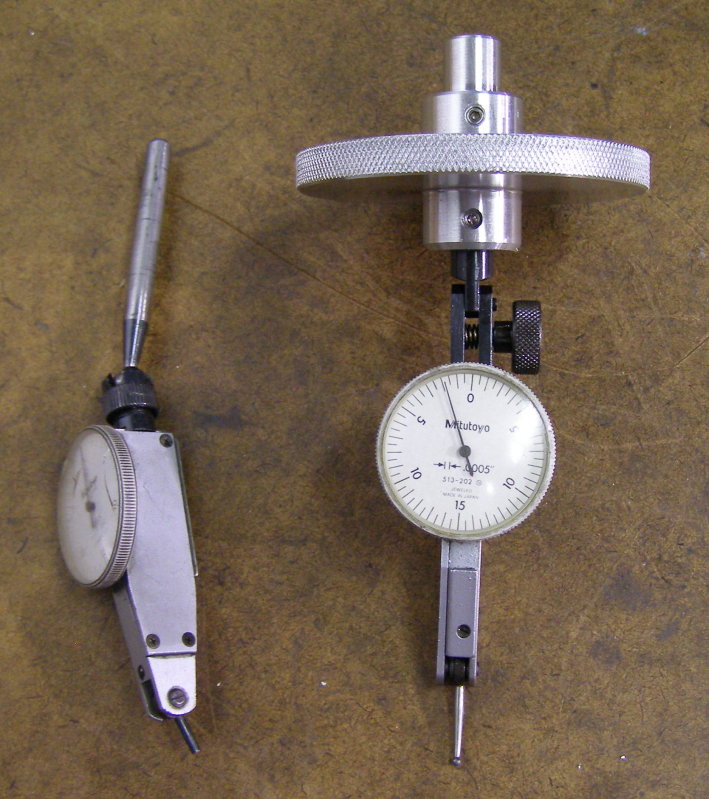
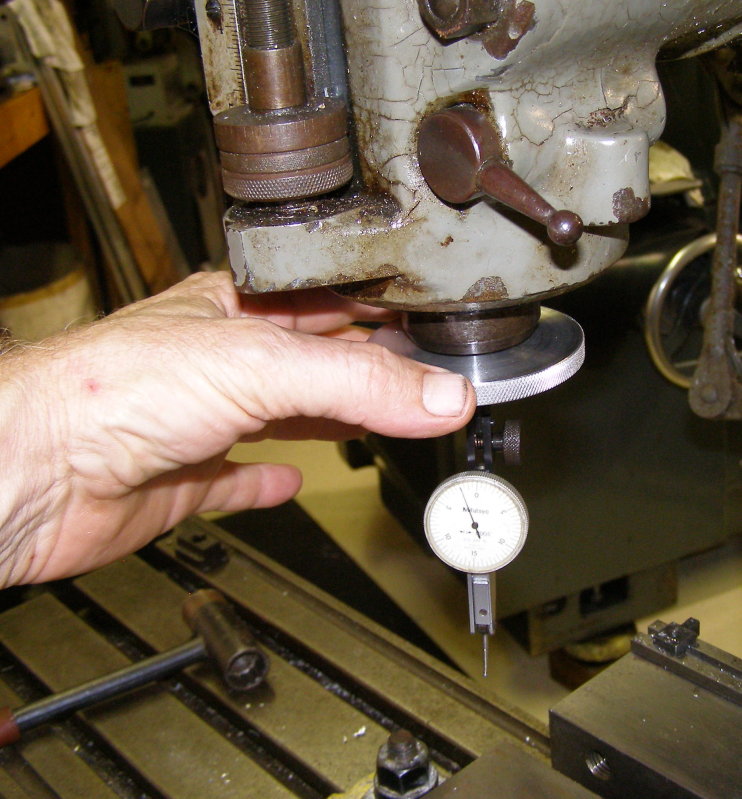
Glenn Wegman's Indicator Holder
I really liked Glenn Wegman's indicator holder because it has a knurled wheel to make easy to turn the spindle while using it:
How Many Plates, Er CNC Machines, Can You Keep Running at the Same Time?
I've seen numbers up to maybe 4 or 5 machines. Load one up, hit Cycle Start, go to the next one, rinse repeat. If you can keep 4 or 5 machines going at the same time, that's hot stuff. Most shops think about their business as though the machines are "hourly income". A machine makes say $75/hour. Keep 4 of them going with one operator and that's $300/hour.
But with so much going on, it's easy to lose some minutes here and there. You walk away and get focused on something, the machine finishes, and you don't notice. What to do?
I liked the note in this PM thread about a guy named "Ox" who started clipping egg timers on to his clothing. One for each machine. Start the timer when you hit cycle start. When it beeps, it's time to go back to check on the machine.

11/5/09
Single-Edged Razor Blade Line Pivot
A diagram for a CNCZone discussion:
11/3/09
Nice Rigidity Bump Up for Small Sieg Mills
Dougal over on CNCZone has the right idea. He bolted a nice piece of channel to the back of his Sieg X2's column. It even looks factory:
Now why the heck doesn't the factory do that?
11/2/09
The Case for Parabolic Drills and Some New G-Wizard Functionality
It is always hard to drill deep holes, where deep is defined by a hole that is many diameters of the drill bit deep. I recently came across a question on CNCZone that started me doing some research on the topic of parabolic drills. Parabolic-style drills were developed in the early 1980s. They use a heavier web to create higher rigidity and increased flute area for chip removal on deep-hole drilling operations.
Precision Twist Drill has a nice discussion on their site of how to vary feeds and speeds to accomodate deep holes when using regular and parabolic twist drills. I was so taken by the CNCZoner's question and that nice discussion that I wound up adding a bunch of functionality to my G-Wizard Machinist's Calculator.
The new functionality is both to implement the feeds and speeds adjustments recommended by Precision Twist for deep holes, but also to give recommendations based on the hole depth. For example, it suggests when you need to use a peck drilling cycle (where you drill down a little ways and then retract to clear chips) as well as when you should be considering a parabolic bit instead of a regular twist drill.
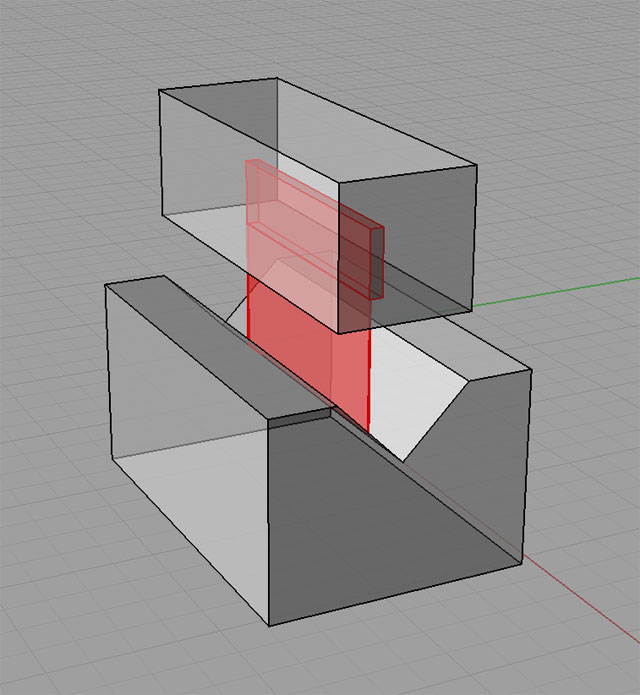
The question the CNCZoner raised was what feeds and speeds to use when drilling a 0.201" hole 3.5" deep. That's over 17x the diameter in depth, so a parabolic drill is definitely called for!
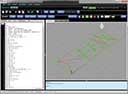
Here is what G-Wizard shows when you enter those parameters:
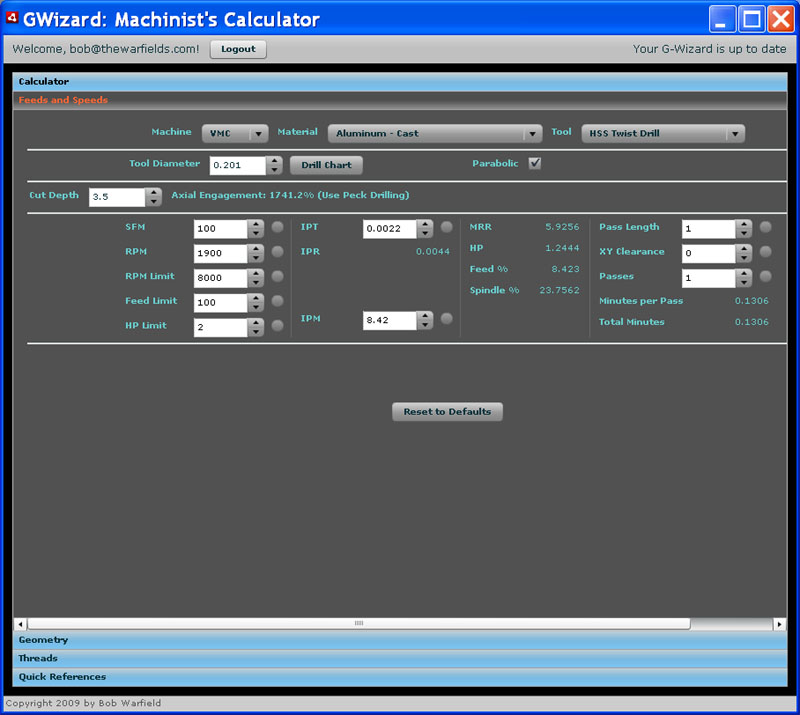
Note the box for Parabolic is checked, which tells G-Wizard we want to use a parabolic drill. Also, it is recommending a peck drilling cycle (DUH!) for this 17.412x Diameter hole depth. If we enter a less severe hole depth, 0.2", it recommends 3800 rpm and a feed of 16.85, whereas you can see from the diagram it has compensated for hole depth and slowed down both the feeds and speeds. The feed is slowed as a result of the spindle rpm. Parabolics don't need further slowing. A regular twist drill would also get feedrate reduction on top of that.
11/1/09
More Clamping Tricks
Ray Behner's clamping trick spawned some more good ideas:
I'm going to have to CNC a big table clamp like that one on the right!
Of course the table clamps can be turned on their sides to accomplish the job in the bandsaw vise!
|
Do you want to be a better CNC'er in 37 Seconds? Get Better Tool Life, Surface Finish, and Material Removal Rates Fast. It's that easy. You can install and get results now.

|
||||||||||||||||||
| ||||||||||||||||||